In my early days of designing bags and backpacks, my go-to drawing software was Adobe Illustrator and occasionally Inkscape. Both programs were serviceable enough. Until they weren’t. Matching seam lengths felt like trying to parallel park a cruise ship, and adjusting even the smallest dimension meant a tedious hunt for every affected line or angle.
Vector graphics programs still have their place in my workflow: concept sketches, documentation illustrations, and final polish before printing. Technical drafting, though, remains a struggle. Yes, community-created tools (like the Unroll Path Inkscape Extension by Prickly Gorse) have arrived in recent years, making life somewhat easier. Still, for precise technical drafting, relying solely on vector graphics software feels about as effective as buttering toast with chopsticks. Technically possible, but painfully impractical.
One especially frustrating evening, I stumbled onto Valentina, a free, open-source drafting software. I promptly installed it, tried it, and hated it. It seemed rigid, clunky, and unintuitive, so I shelved it with mild disdain.
Several months later, armed with newfound patience and perhaps lowered expectations, I gave Valentina another chance. This time, something clicked. Yes, it occasionally crashes, updates are infrequent, and drawing order matters (a lot!) But its strengths outweighed these quirks, transforming hours of tedious work into minutes letting me spend more time sewing and less time banging my head against the keyboard.
Introduction
Designing custom backpack patterns can be immensely satisfying—at least, it can be once you find the right tools. Valentina, a free, open-source drafting software, born from a split with Seamly2D, is tailored specifically for technical pattern drafting, offering a powerful, dimension-driven design environment.
This guide introduces the basics of using Valentina for backpack pattern creation. Though this specifically covers Valentina, many concepts will apply to Seamly2D as well.
This guide assumes that you already have experience in using a pattern to sew a pack and that you understand the fundamentals of basic backpack construction. I found it easier to learn this tool when I had a specific project I wanted to create instead of just aimlessly poking and prodding at the various tools. As with everything, your learning style might be different so do what works best for you.
Download and Install Valentina
Grab the latest version of Valentina from the official website1. Installation is straightforward. No advanced degree required.
Launch Valentina and Create a New Project
Open Valentina, start a new project, name your first pattern piece (e.g., “BackPanel”), and choose measurement units (inches or centimeters). Choose wisely. Switching later isn’t exactly user-friendly.
Input Your Desired Measurements
Valentina excels at parametric design, updating automatically as measurements change. Input critical dimensions (panel sizes, webbing widths, zipper widths, and other relevant dimensions) before sketching.
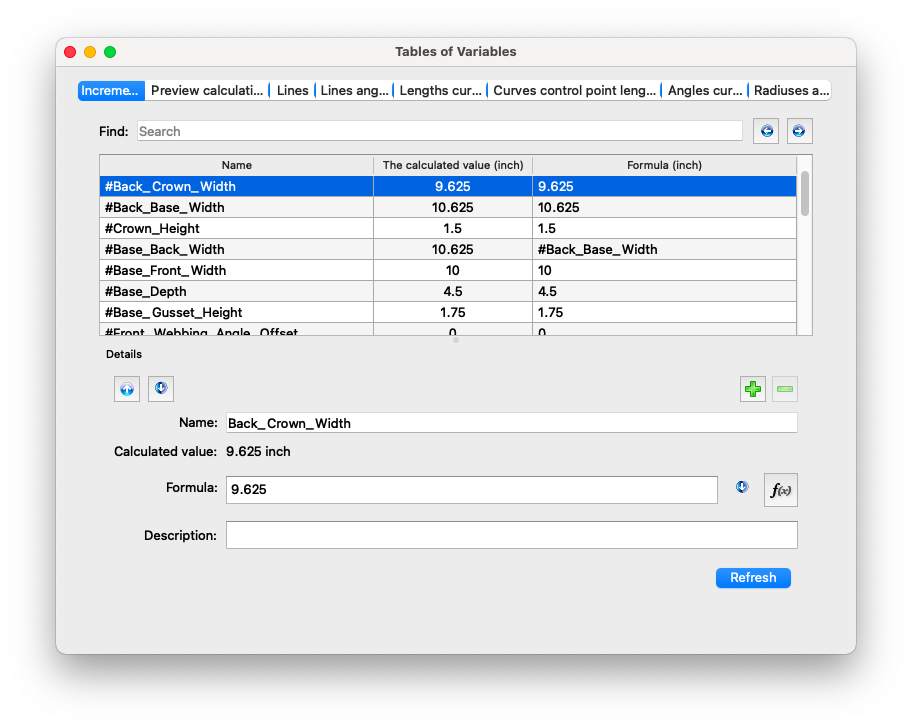
Using the Variables Table
Within the Measurements menu, find your new best friend: the Variables Table. Store every critical measurement here, making future adjustments as easy as adjusting one number instead of forty-seven.
If later you decide your backpack needs to be slightly larger—say, because you’ve given up the ultralight game—updating a few values here can update your entire pattern.
Tape and Individual Measurement Files
Valentina also supports standard measurement sets (known as “tape files”) and personalized measurement files. Use tape files for standardized measurements (useful for off-the-rack sizing) and individual measurement files for custom, reusable measurements (perfect for tailor-made projects).
Informational Detour RE: Workflow
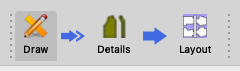
Before we go on, it’s worth mentioning that Valentina’s workflow has three distinct phases:
- Draw: Sketch pattern pieces with points, lines, and curves (this step has the steepest learning curve).
- Detail: Refine sketches into pattern pieces, adding seam allowances, notch markings, labels, orientation markers, and more.
- Layout: Prepare patterns for print or export (the victory lap).
We’ll cover each in detail.
Create a New Pattern Piece in Draw Mode
In Draw Mode, create your first pattern piece. It starts humbly: hit “New pattern piece,” name it clearly, and admire your masterpiece: a single dot named “A.” You’ve never felt so accomplished.
I recommend getting a feel for drawing in Valentina by starting with the “point at distance and angle” tool for simplicity. Select your point, click elsewhere, and input precise angles and lengths. Enter precise dimensions or angles using the interactive menu, ideally referencing your predefined variables.
Valentina boasts a couple dozen drawing tools. I won’t detail each here (that’s what documentation is for), but feel free to experiment. It’s okay to make mistakes—that’s what Ctrl+Z is for.
Draw Additional Pieces with Variables and Formulas
Each panel of your backpack deserves its own pattern piece, keeping your workspace uncluttered. Incorporating variables and formulas turns your design dynamic:
- Define variables: Before drawing, set dimensions as variables (e.g., “BackPanelLength”).
- Use variables while drawing: Input variables directly instead of raw numbers. For variables from the Variable Table, preface the variable with #. For instance, BackPanelLength would be
#BackPanelLength - Formulas: Use formulas for proportional relationships. For example, make your base length always 80% of your back panel length:
#BackPanelLength * 0.8.
Valentina becomes more powerful the more you embrace variables and formulas. You’ll soon wonder how you lived without them.
Drawing Mode vs. Detail Mode
Draw mode is your drafting playground. Sketch basic shapes, set lines, curves, and arcs. But before moving forward, you must create at least one “detail” using the Workpiece tool.
Creating details:
- Select the Workpiece tool.
- Click your pattern outline points (clockwise preferred). Hold shift if you insist on going rogue and selecting points counterclockwise.
- Press Enter, name your pattern piece, and voilà—a detail is born.
Detail mode is where you refine individual pattern pieces with seam allowances, labels, and other finishing touches. Move between Draw and Detail modes using the toolbar. Smooth transitions mean fewer headaches.
Seam Allowances and Notches
In Detail mode:
- Right-click a piece and select Options to open the Workpiece Tool.
- Activate “Seam Allowance” and set your preferred widths. Be as specific as you like.
- Add notches by right-clicking on points in the Workpiece Tool and choosing Passmark. Customize notch styles to your heart’s content.
- Check carefully to ensure you’ve applied seam allowance everywhere needed. Otherwise, you’ll be in for a surprise later. A surprise that involves a seam ripper.
Generating Layouts and Printing
Enter Layout mode to allow Valentina to efficiently arrange your pieces on paper, minimizing waste. One option is to set your printing options and let Valentina do the hard work.
Alternatively, if you’re particular (and let’s face it, if you’re still reading, you probably are) skip the layout entirely and export pieces to SVG (tool is available inside of Detail mode). Using a tool like Inkscape to arrange pattern pieces gives you ultimate control: line weight, colors, annotations. Now you can make it the finished pattern look precisely as aesthetically pleasing as you want.
When printing, consider A0-size PDFs from local print shops or a print-and-ship service online (pdfplotting.com is outstanding, by the way.) Your back and your tape dispenser will thank you for skipping the A4 taping torture.
Cut, Assemble, Brag
Pattern in hand, it’s time to assemble your creation. Grab your sewing machine, scissors, and beverage of choice because construction awaits. Celebrate your finished backpack with modesty or an Instagram post.
Conclusion
Valentina is quirky but powerful. Once you embrace its structured workflow and overlook its charming imperfections, you’ll wonder how you tolerated previous drafting methods. Welcome to Valentina—your pattern making life just became simpler (mostly).
Footnotes
-
Also seems to be available at https://smart-pattern.com.ua/en/. ↩